Setup Cutting Optimizer
The setup for Cutting Optimizer is essential to tailor the program to your business needs. During setup, you configure general settings like order numbering, language preferences and contact information. You also need a user account. This topic ensures a seamless transition from the trial period to a suitable subscription
! Note
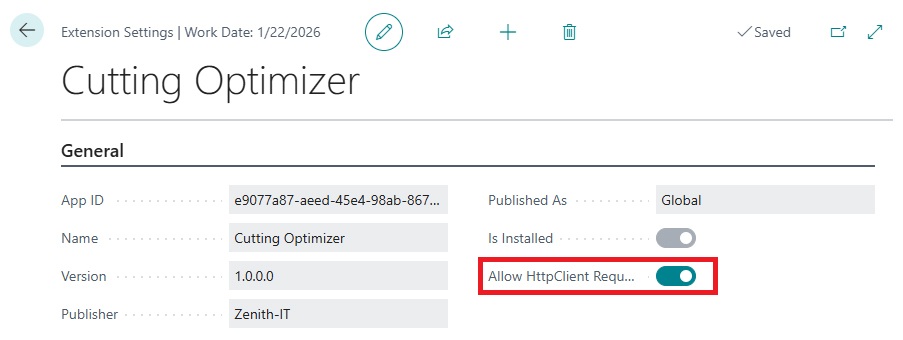
Before you start, check in the installed extension that the option Allow HTTP client requests is switched on.
-
Choose the
 icon, enter Extension Management, and then choose the related link.
- Choose the Cutting Optimizer extension.
- A window with Extension Settings will open.
- Switch on the option: Allow HTTP client request.
Setup
General information- Choose the icon, enter Cutting Optimizer Setup, and choose the related link.
- The Cutting Optimizer Setup screen will open.
- In the Order Nos. field select Cutting Orders.
! Note
If the order number series does not yet exist, Choose New. A blank line will appear. Enter the desired code, description and starting number.
- The company information is automatically populated by Business Central from your Company Information and cannot be edited. If the information needs to be changed. Go to the Company Information page to make the adjustment.
- In the Language Code field, select your preferred language for communication. If your language is not available, communication will be done in English.
- Under Primary Contact Information, enter all the details of the person responsible for licenses and installation.
- Click Create Account in the Action Bar.
- Confirm by clicking Yes. Creating the account may take a few seconds.
- Choose Get Account Messages in the Action Bar
- Confirm the prompt "Request information about the account?" by clicking Yes.
-
Here, if there are important messages, you can find information regarding:
* The status of your license (e.g., if it is about to expire)
* New releases and updates.
* Notifications about your subscription and program progress.
- Click Subscriptions to view an overview of your subscriptions.
- Upon the first installation of Cutting Optimizer, a 30-day free trial will automatically start.
-
After the trial period, you can subscribe to Cutting Optimizer:
* Click Add Subscription.
* Choose a subscription based on the number of users (e.g., 5 or 10 users).
* Click Subscribe for the desired subscription.
* Confirm subscribing by clicking Yes. The subscribe page will close and go back to the Subscription page.
- On the line of the added subscription Select your preferred payment method.
- Click Pay and confirm the prompt 'Would you like to pay …?' by clicking Yes.
- You will then be redirected to our bank’s payment page, where you can complete the payment. Once done, you will be automatically redirected back to our website, where you can view the payment status. This page can be closed.
-
Go back to the subscription list in Business Central and choose Update in de Action bar.
The payment is now updated according to the payment status. If the status failed due to special reasons. You will be able to repeat the payment until it is completed.
Subscription Management
Your subscription is automatically renewed each year. If you wish to cancel your subscription, please use the Cancel column. Cancelation needs to be done at least one month before the end date.
! Note
Your subscription will remain active until the end of the term. Refunds for the subscription fee are not possible.
Have you canceled your subscription but want to keep using Cutting Optimizer, simply click on the
Renew column to activate your subscription again.